Imagine the creamiest, most decadent ice cream, studded with crunchy chunks of your favorite chocolate sandwich cookies. Now, imagine making it yourself, right in your own kitchen, without needing a fancy ice cream maker. Sounds like a dream, doesn't it? Well, it's about to become your delicious reality! Today, we're diving into the ridiculously simple yet utterly satisfying world of no-churn Oreo ice cream. This isn't just a quick and easy recipe; it's a game-changer for anyone craving an indulgent treat that tastes even better than store-bought.
Whether you're a seasoned baker or a complete novice in the kitchen, this homemade Oreo ice cream recipe is foolproof. With just three core ingredients and a few simple steps, you'll whip up a dessert that will have everyone begging for more. Forget the complex machinery and lengthy chilling times – this is pure, unadulterated ice cream joy, made accessible to all. So, let's gather our ingredients and prepare for a truly sweet adventure!
Why You Need This No-Churn Oreo Ice Cream Recipe in Your Life
In a world of complicated recipes and specialized kitchen gadgets, this no-churn Oreo ice cream stands out for its elegant simplicity and incredible results. It’s the kind of dessert that brings smiles, creates memories, and satisfies even the most intense sweet cravings. My own family, much like many others, found this recipe to be an instant hit, quickly becoming a weekly request. There's a particular magic in taking everyday ingredients and transforming them into something truly extraordinary, and this recipe embodies that.
The Magic of No-Churn
The concept of "no-churn" ice cream is a revelation. Traditionally, making ice cream at home required an ice cream machine to constantly churn the mixture, preventing ice crystals from forming and creating that smooth, creamy texture. However, culinary innovators discovered that by incorporating sweetened condensed milk and whipped heavy cream, you could achieve a remarkably similar (some would argue, superior) texture without any churning at all. The sweetened condensed milk acts as a natural antifreeze, preventing large ice crystals, while the whipped cream introduces air, giving it that light, fluffy, and incredibly rich consistency.
Beyond the technical wizardry, the no-churn method offers unparalleled convenience. It's a fantastic activity to do with kids or grandkids, involving simple steps that are fun and engaging. Plus, the quick prep time means you spend less time in the kitchen and more time enjoying the anticipation of a truly special treat. Whether it's for a birthday celebration, a casual weekend dessert, or just a spontaneous craving, this no-churn Oreo ice cream recipe delivers every single time.
The Simple Secrets: Just Three Core Ingredients
The beauty of this oreo ice cream recipe lies in its minimalist ingredient list. You don't need exotic flavors or a pantry full of obscure items. Just three accessible ingredients come together to create a dessert that tastes far more complex than it actually is. This simplicity not only saves you time and money but also ensures that the star of the show – the delightful combination of creamy vanilla and crunchy Oreos – truly shines.
The Stars of the Show: What You'll Need
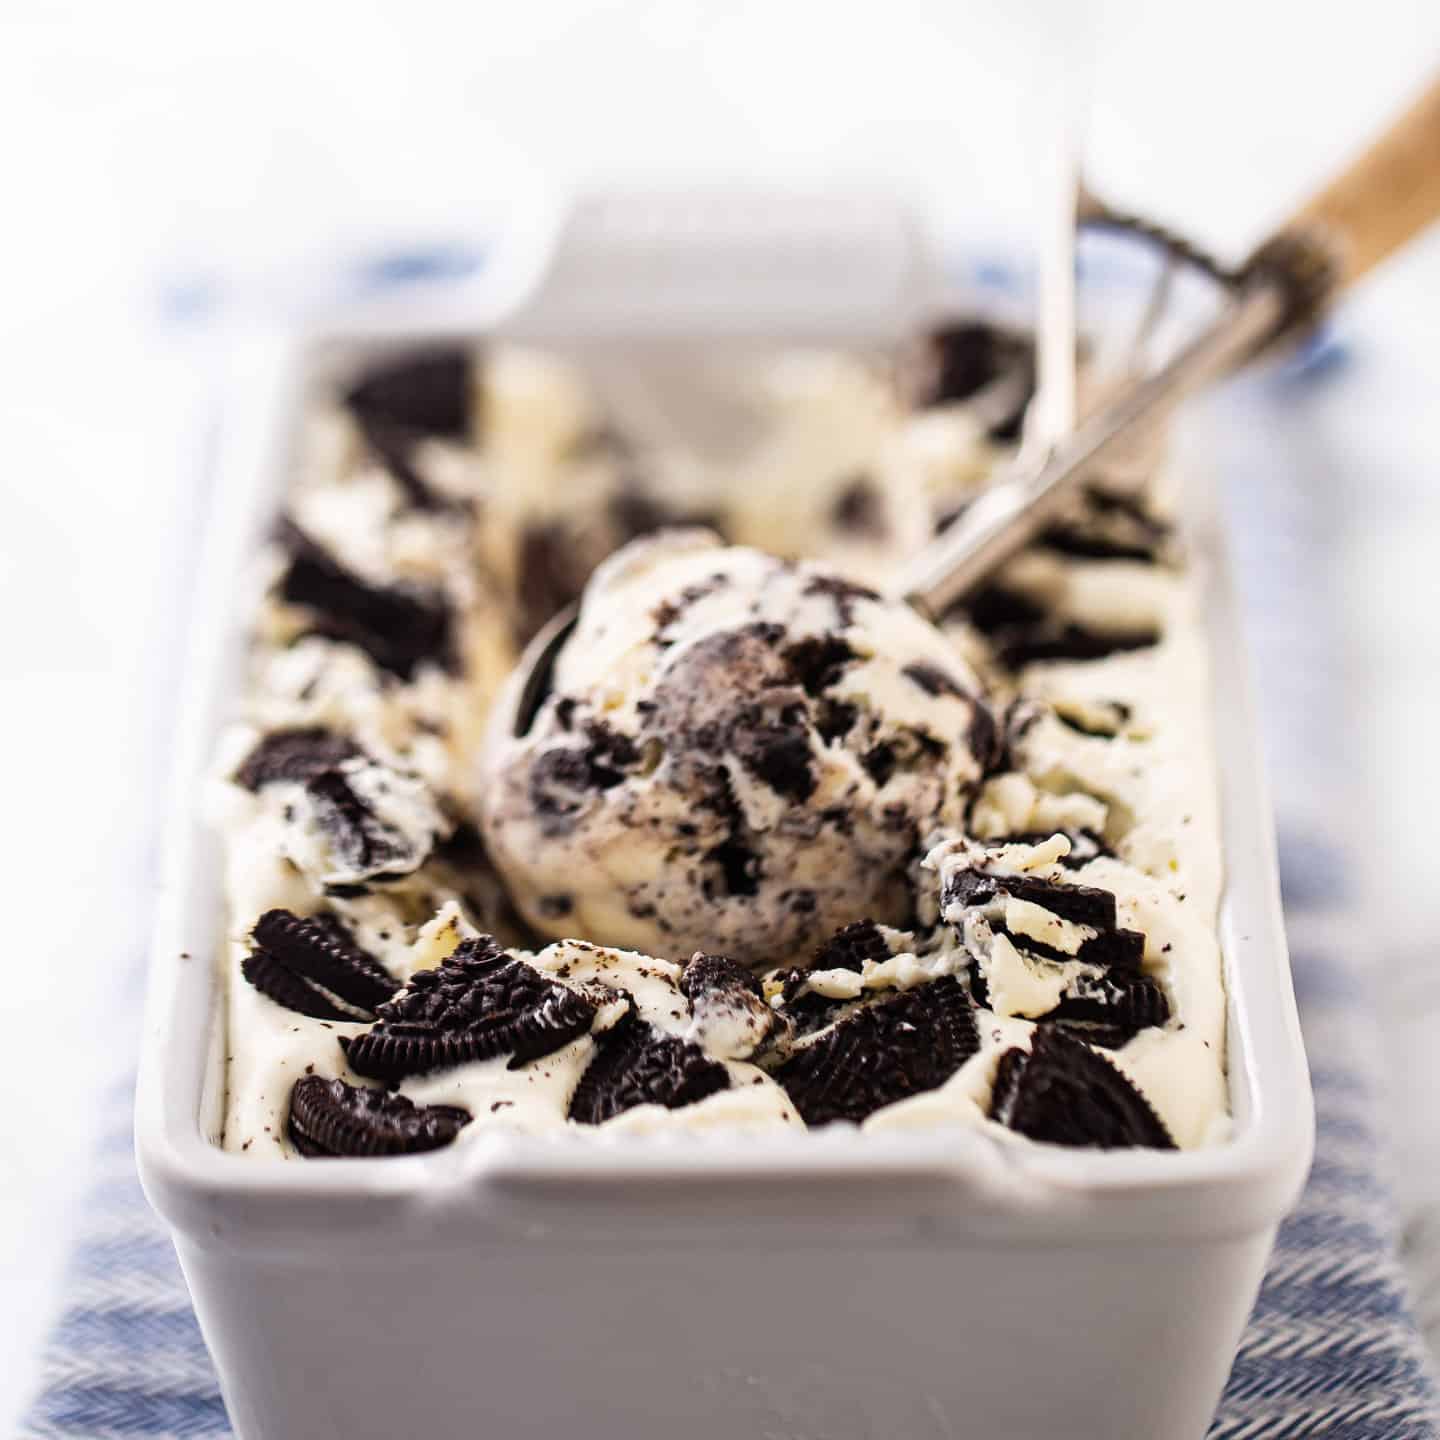
- Oreo Cookies: The quintessential ingredient! You'll need a standard pack of classic Oreo cookies. These provide the iconic chocolatey crunch and that unmistakable "cookies and cream" flavor. We’ll be crushing most of them, but make sure to save a few extra for a stunning topping. The mix of fine crumbs and larger chunks provides an exciting textural contrast that makes this ice cream so addictive.
- Sweetened Condensed Milk: This is the unsung hero of no-churn ice cream. It provides the sweetness, but crucially, its thick, syrupy consistency and high sugar content are what prevent the ice cream from freezing into a solid block of ice. Important: Be absolutely sure you’re using sweetened condensed milk, not evaporated milk. They are not interchangeable for this recipe.
- Cold Heavy Whipping Cream: This ingredient is essential for creating the light, airy, and creamy base. When whipped, it incorporates air, transforming into a cloud-like texture that, when frozen, becomes the perfect ice cream consistency. The colder it is, the better it whips!
Essential Ingredient Tips for Success
While the ingredients are few, a couple of expert tips can elevate your homemade Oreo ice cream from delicious to absolutely divine:
- Temperature is Key for Cream: Always start with very cold heavy whipping cream. Chilling your mixing bowl and beaters in the freezer for 10-15 minutes beforehand can also make a significant difference. Cold cream whips faster, achieves stiffer peaks, and holds its structure better, all contributing to a thicker, fluffier ice cream.
- Cream Fat Content: For the creamiest results, opt for heavy whipping cream with at least 35% milkfat. This higher fat content ensures a rich texture and stable whipped cream.
- Double-Check Your Milk: Seriously, this bears repeating: confirm you have sweetened condensed milk. Evaporated milk is unsweetened and much thinner, and its use will result in a watery, icy mess rather than the creamy treat you're aiming for.
Your Step-by-Step Guide to Irresistible Oreo Ice Cream
Making this no-churn Oreo ice cream is less about precision and more about simple assembly. It’s an incredibly forgiving oreo ice cream recipe, perfect for beginners, yet yields results that taste like they came from a gourmet ice cream parlor. Follow these steps, and you’ll be scooping up pure bliss in no time.
Step 1: Crush Those Cookies
The texture of your crushed Oreos makes a big difference! Place your desired amount of Oreo cookies (reserving a few whole or roughly chopped for topping later) into a large, sealable plastic bag. Now, for the fun part: grab a rolling pin, a meat tenderizer, or even a sturdy can from your pantry, and start smashing! Aim for a mix of fine crumbs and larger, satisfying chunks. This variety ensures every bite offers a delightful crunch.
Pro Tip: For quicker crushing and a more uniform texture, you can also pulse the Oreos in a food processor or blender. Just be careful not to turn them into a fine powder; you want those distinct cookie bits!
Step 2: Whip Up the Dreamy Base
Into a large, chilled mixing bowl, pour your very cold heavy whipping cream and the sweetened condensed milk. Using an electric hand mixer (or a stand mixer with the whisk attachment), begin whipping on low speed until the two liquids are just combined. Then, increase the speed to high and continue mixing until stiff peaks form. This means when you lift the beaters, the cream stands up straight, holding its shape firmly. This process infuses the mixture with air, which is crucial for the ice cream's light and fluffy texture.
Step 3: Gently Fold in the Fun
Now for the main event! Take your crushed Oreo cookies and gently fold them into the whipped cream mixture. The key here is to be delicate. Use a spatula and a light hand, folding from the bottom up, just enough to distribute the cookie bits evenly throughout the creamy base. Overmixing will deflate the whipped cream, leading to a less airy and icy ice cream. We want to preserve that delightful fluffiness!
Step 4: Freeze to Perfection
Once your mixture is beautifully combined, scoop it into a three-pound loaf pan (or any freezer-safe container of similar size). Smooth the top gently with your spatula. Now, take those reserved Oreo cookies – either whole or roughly chopped – and sprinkle them generously over the top. This not only looks appealing but adds an extra layer of crunch when you dig in.
Cover the pan tightly with plastic wrap, ensuring it touches the surface of the ice cream to prevent ice crystals from forming on top. Place it in the freezer for at least six hours, or preferably overnight, for best results. The longer it freezes, the firmer and more scoopable it will be.
Elevate Your Oreo Ice Cream Experience: Tips & Tricks
While the basic oreo ice cream recipe is incredible on its own, a few extra insights can turn your homemade treat into a gourmet delight. These tips focus on optimizing texture, making serving easier, and even expanding your flavor horizons.
Pro Tips for the Perfect Scoop
- Chill Your Tools: As mentioned, very cold cream is crucial, but extending that chill to your mixing bowl and beaters can significantly cut down whipping time and improve the stability of your whipped cream.
- For Easy Scooping: If your ice cream is rock-solid from extended freezing, simply let it sit at room temperature for 5-10 minutes before serving. For even smoother scoops, dip your ice cream scoop in warm water between each serving.
- Storage Matters: To prevent freezer burn and maintain optimal texture, always store your homemade ice cream in an airtight container. If using a loaf pan, ensure the plastic wrap is tightly sealed against the surface of the ice cream before putting on a lid or additional foil. It will last deliciously for up to two weeks.
Creative Customizations and Variations
The beauty of this base oreo ice cream recipe is its versatility. Once you master the classic, feel free to experiment!
- Flavor Extracts: Add 1-2 teaspoons of vanilla extract (or almond, peppermint, coffee) to the heavy cream before whipping for an extra layer of flavor.
- Chocolate Lover's Dream: Swirl in some hot fudge or melted chocolate before freezing, or fold in chocolate chips alongside the Oreos.
- Caramel Swirl: A drizzle of caramel sauce can add a rich, buttery counterpoint to the Oreos.
- Different Cookies: Don't limit yourself to just Oreos! Try Biscoff cookies, Nutter Butters, chocolate chip cookies, or even crushed brownies for a new twist.
- Mix-ins Galore: Beyond cookies, consider adding chopped candy bars, mini marshmallows, sprinkles, or toasted nuts for extra texture and flavor.
Frequently Asked Questions (FAQs)
- Can I make this ahead of time? Absolutely! This no-churn Oreo ice cream is perfect for making in advance. It needs at least 6 hours to set, but it can happily reside in your freezer for up to two weeks in an airtight container.
- What if my cream won't whip to stiff peaks? Ensure your cream is very cold, and check its fat content (should be 35% or higher). Also, make sure your bowl and beaters are clean and free of any grease, as fat can prevent cream from whipping properly.
- Can I use a food processor for whipping? While some food processors have a whisk attachment, it's generally best to use an electric hand mixer or stand mixer for whipping cream to ensure proper aeration and stiff peaks.
- Why is my ice cream icy? This usually happens if the cream wasn't whipped enough, or if the sweetened condensed milk wasn't used, or if the ice cream was not covered properly during freezing, leading to freezer burn and ice crystal formation.
- Is this suitable for dietary restrictions? This recipe contains dairy and gluten. For dairy-free options, look for plant-based heavy cream alternatives and sweetened condensed coconut milk, alongside gluten-free chocolate sandwich cookies. Results may vary slightly.
There you have it – the ultimate guide to making delicious, creamy, and crunchy Oreo ice cream without a machine. This simple yet incredibly rewarding oreo ice cream recipe is more than just a dessert; it’s an experience, a joyful activity, and a guaranteed crowd-pleaser. So go ahead, gather your ingredients, and whip up a batch today. You'll be amazed at how effortlessly you can create a truly indulgent treat that will quickly become a beloved staple in your home.
